

Did you notice that when you import images into PowerPoint, they are disproportionate in size compared to the slide?

How do you change the size of this image to cover the entire slide? Or crop images in PowerPoint to make them the right dimensions?
To begin, avoid falling into mistakes like this…

The images have proportions that you should never distort, otherwise you will make the photo look deformed.
What did this sweet puppy do to you?
To avoid deformation of the images, especially if you’re building presentations for business or high-stakes meetings, relying on a PowerPoint presentation design agency can ensure professional results.
But if you want to DIY, we use only the diagonal controls and we do it by holding down the SHIFT key on the keyboard.
Why SHIFT?
Because when you drag the white handle to resize a shape or image, holding down the SHIFT key locks the proportions (that is, the relationship between height and width).
On the keyboard you should have the button at the left as well as the right, choose the one you prefer (one is enough).

In general, the images, unlike the forms, have the proportions already blocked by a PowerPoint function that can be seen in the following figure.

However, by custom I always drag with the SHIFT button pressed to avoid doing the question and make sure to keep the proportions correct.
Drag while keeping the proportions but it will not be enough to cover a full slide with the selected image.
In fact, you will notice that, while maintaining the proportions of the image, which are different from those of the slide (which in my case are 16: 9), the image will not be able to cover the entire slide perfectly, unless you try only one of the dimensions.

Therefore, it is necessary to cut the image and for this we will use the function “Crop” of PowerPoint, but we will do it in an unconventional way, follow me.

What everyone does is: extend the image beyond the limits of the slide and then cut it to try to match the dimensions.

However, this method is inaccurate because you can’t see the slide below the image and with the mouse, it is not easy to exactly release the cropping frame on the perimeter of the slide.
Also, you have to cut 2 edges repeating the same operation at least 2 times, it is not efficient, you can do better.
To speed up your PowerPoint presentations, one useful tool is our MLC PowerPoint Add-In, which streamlines the entire workflow, saving you time and increasing efficiency.
The idea that I use when cropping the images is to assign the proportions of the slide to the frame of the image and make the frame correspond to the perimeter of the slide and then fill it simply by enlarging the image.
What are the proportions of your presentation?
In general, they are set to 4: 3 (old and less used format) or 16: 9 (wide screen).
I always work in 16: 9, so my cut will be in 16: 9 ratio (look at yours).

Before you crop images in PowerPoint, to make sure that this technique works, you must center the image on the slide, both vertically and horizontally.

Did you notice where I keep the alignment buttons?
That’s the quick access toolbar moved under the tape. (Set your toolbar to get maximum efficiency).
Returning to our cutout, do not click on the large button but open the drop-down menu using the arrow below to find the proportional crop.
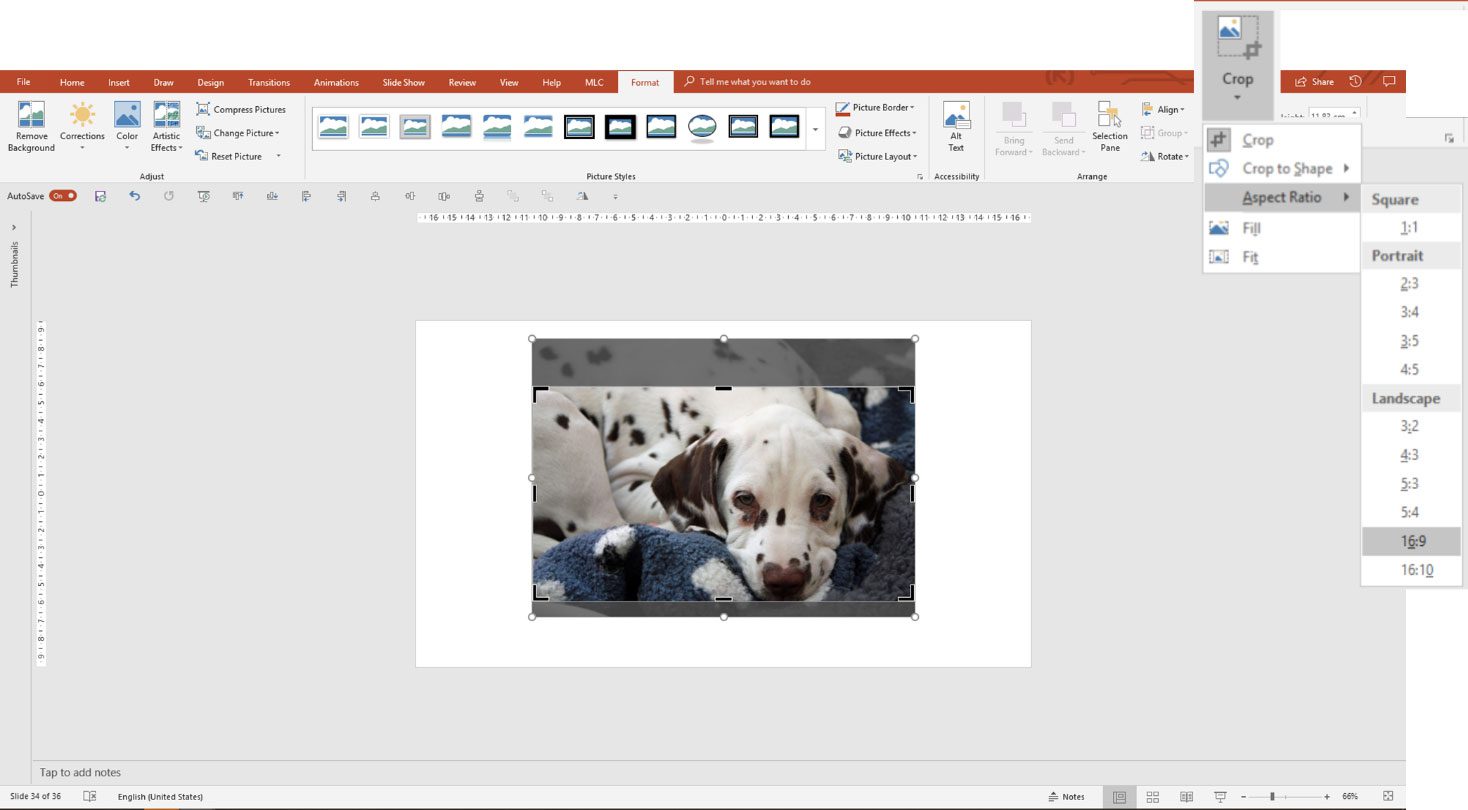
Once you have selected the required ratio, you will see that the crop will be applied automatically.
The cropping frame is distinguished by the handles to change the size, since it is characterized by handles in black and in the form of a line or an angle.
Now you have to drag the black handles so that the cropping frame matches the edge of the slide. To do this accurately and in a single step, I press SHIFT to keep the proportions and CTRL to activate all the frame controls at the same time during the drag.
In this way it will be enough to carry out the dragging once and not having to do it for all the handles.
Be careful, I am dragging one of the diagonal controls of the clipping frame while holding down SHIFT + CTRL on the keyboard.

Now you have to fill the clipping box with the image and to do so just open the “crop” menu and use the “fill” function.

The black areas above and below the image show you the parts of the photo that will be masked or cut out.
The image is cropped “in vivo” at the edges of the slide to perfectly cover the page.
Comments on Crop images in PowerPoint like a PRO